How to Add Keywords and Meta Descriptions in WordPress

Do you want to properly add keywords and meta descriptions in WordPress?
Meta keywords and descriptions allow you to improve your website’s SEO ranking. This means more traffic, leads, and sales for your business.
In this article, we will show you how to easily add keywords and meta descriptions in WordPress.
Why Add Keywords and Meta Descriptions in WordPress?
Keywords and descriptions allow you to tell search engines more about the content of your posts and pages.
Keywords are important words or phrases that people are likely to search to find your content. A meta description is a brief description of what your page or post is about.
It’s your meta title, description, and keywords that shows up in Google search results:
Meta keywords and meta description are HTML meta tags. They form part of your website’s header code. They don’t appear on your page or post for visitors to see. However, search engines and browsers can use them.
WordPress SEO plugins make it super easy for you to add them from your WordPress admin area for each post and page on your website.
How Important are Meta Keywords and Meta Descriptions for SEO?
Like most WordPress users, you are probably wondering will adding meta keywords and meta descriptions will improve my WordPress SEO rankings.
While search engines don’t exactly share how much weight they assign to keywords or description, SEO experts always recommend adding proper meta description and keywords for on-page SEO optimization.
Meta descriptions are widely used by search engines. In Google’s search results, they appear below your content’s title, with the search term shown in bold.
An effective meta description will encourage users to click through and read your content. And what we do know is that a good click through rate means Google will likely rank your content higher.
Now when it comes to meta keywords, most modern search engines either assign very little importance or don’t use them at all. The main exception is the Russian search engine Yandex.
Instead search engines prefer that you add your focused keywords in your title, description, and through out your content. This is why SEO plugins like AIOSEO comes with a TruSEO score that helps you optimize your content for focused keywords and keyphrases.
Our Recommendations for Meta Keywords and Meta Descriptions
We recommend adding a meta description for all the posts and pages on your site, including your homepage, category pages, and tag pages.
Note: Google customizes the description based on the search query, so it will only use your meta description some of the time. However, it’s still worth creating a meta description. It will appear for around 30% of users, and it can help your SEO.
When it comes to meta keywords, it’s up to you whether or not to use them. They will not harm your site, but they may not have much benefit either.
Having said that, let’s take a look at how to easily add keywords and meta descriptions in WordPress.
Installing and Activating All in One SEO for WordPress
For this tutorial, we will be using All in One SEO (AIOSEO) which is the best WordPress SEO plugin on the market. It allows you to easily optimize your entire WordPress site for better SEO and comes with comprehensive set of tools to grow your business.
First, you’ll need to install and activate the All in One SEO plugin. For more details, see our step by step guide on how to install a WordPress plugin.
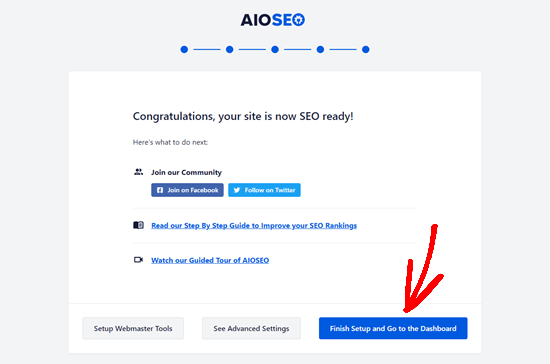
Upon activation, All in One SEO will take you through a simple setup wizard. Just follow the step by step instructions to get everything set up for your site.
After completing the setup, simply click the ‘Finish Setup and Go to the Dashboard’ button.
Enable Meta Keywords Support in All in One SEO
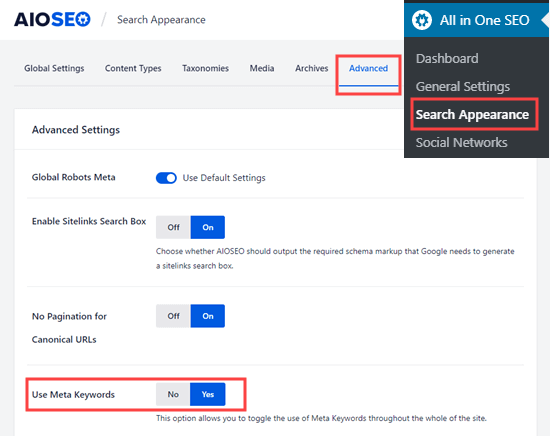
All in One SEO comes with built-in support for meta description and keywords. However, the meta keywords feature is turned off by default. This is because many search engines give little or no importance to keywords in their rankings.
To enable it, go to All in One SEO » Search Appearance » Advanced in your WordPress dashboard. Then, switch the meta keywords toggle from No to Yes.
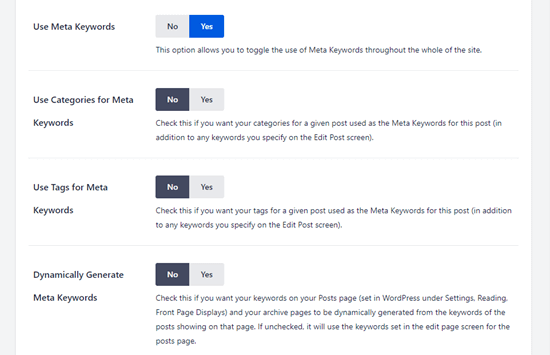
After enabling meta keywords in WordPress, you will see some additional options. You can generate a post’s keywords from its categories and/or tags. Also, you can dynamically generate keywords on your blog posts and archive pages.
It’s up to you whether you want to use these automated options or not. Regardless, you will always be able manually define keywords for each post and page.
Don’t forget to click the ‘Save Changes’ button at the bottom of the page after making changes.
Adding Meta Descriptions and Meta Keywords to Your WordPress Posts and Pages
First, you need to edit a post or page where you want to add your meta keywords and meta description.
AIOSEO works on both WordPress block editor (Gutenberg) and WordPress classic editor.
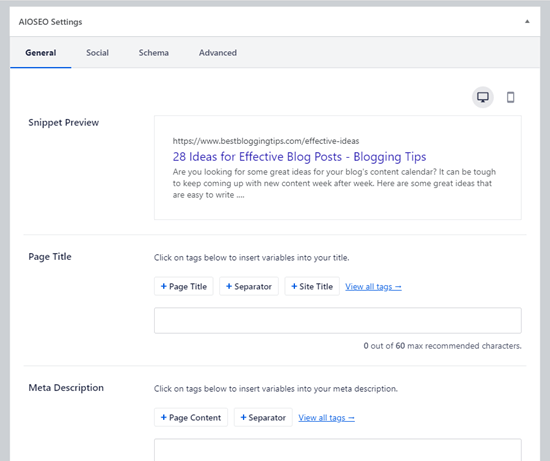
Once on the content editor screen, scroll down to the ‘AIOSEO Settings’ box below the content area.
Adding a Meta Description to Your Post or Page Using AIOSEO
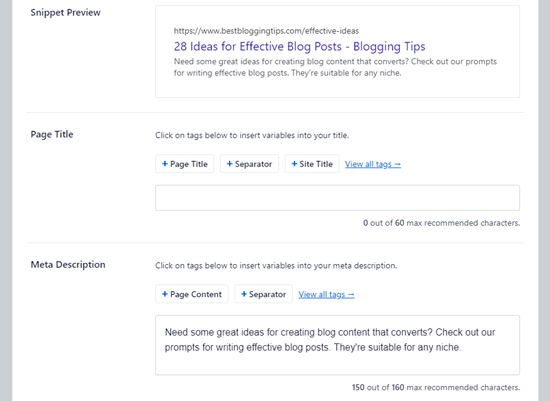
You will see your site’s title and an automatically generated description as the snippet. Below that, you’ll see the Meta Description field.
Go ahead and enter a description into your Meta Description field. All in One SEO will let you know how many characters you’ve used. This is important because Google will only show 160 characters in the search results.
You’ll see that your snippet preview automatically updates as you type your meta description.
Once you’ve finished, simply save or publish your post to save the changes to your meta description.
Using All in One SEO’s Dynamic Tags in Your Meta Descriptions
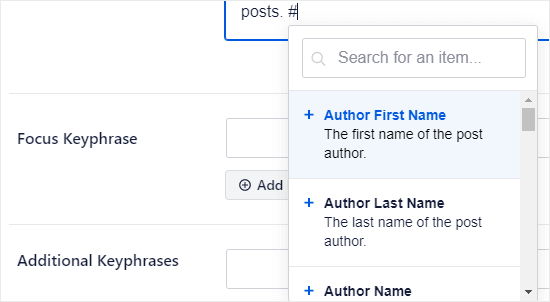
Optionally, you can add tags to your meta description. The ones that All in One SEO offers by default are Page Content and Separator, but you can add other dynamic tags as well.
For example, we’ve added the author’s name to our meta description here.
To add a tag, simply type the # character into the meta description box. You’ll then see a dropdown menu of available tags.
Adding Meta Keywords to Your Post or Page Using AIOSEO
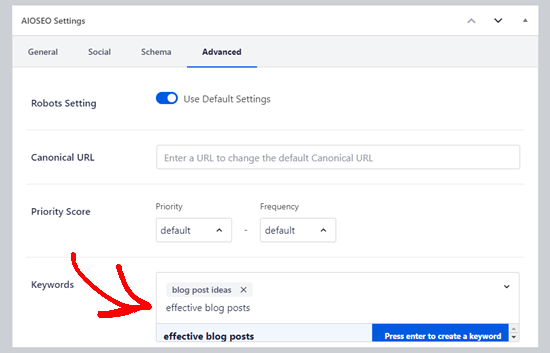
To add your meta keywords, you need to click the Advanced tab for your AIOSEO settings.
Simply type in your keywords, and press Enter after each one. It’s important to only use keywords that are relevant to your content. Adding irrelevant keywords will not give you any SEO benefits.
Tip: Meta keywords are completely separate from your Focus Keyword. You can set a Focus Keyword under the General tab. This is for All in One SEO to give you recommendations about improving your content. The Focus Keyword doesn’t automatically become a meta keyword for your post or page.
Adding Meta Keywords and Meta Description for Your Homepage
You can also add meta keywords and a meta description for your website’s homepage in WordPress. Here is how to do that using All in One SEO.
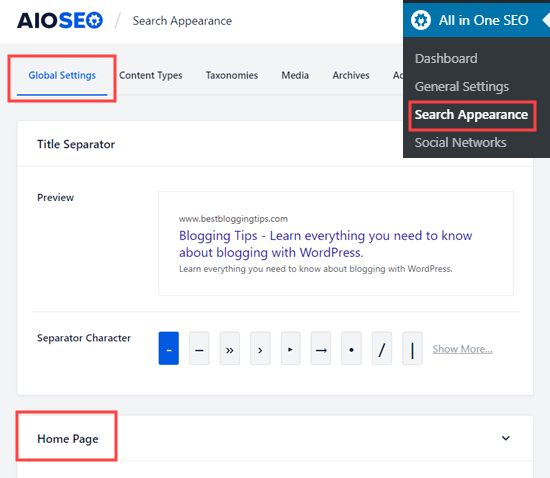
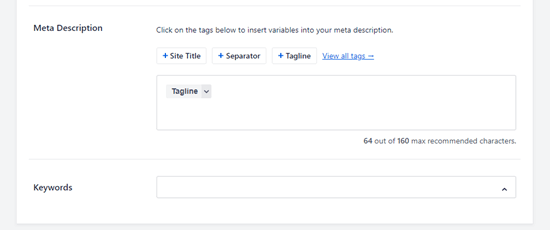
First, go to Search Appearance » Global Settings in your WordPress admin. Then, scroll down to the Home Page section.
On this screen, you can easily enter a meta description and keywords, just like you would for a post or page.
All in One SEO will use your tagline as your meta description by default. You can leave that in there or you can customize it.
You can also click on the other options to add those tags into your meta description. Alternatively, you can add different tags by typing the # character in your meta description, as described above.
Tip: It’s better to use these tags rather than manually typing your site title, tagline, or separator character. This is because your meta description will automatically be updated if you later make changes to any of those.
Make sure you click the Save Changes button at the bottom of the page after adding your meta description and keywords.
Meta Keywords and Description for WordPress Category Archives
You can also add keywords and description to your category and tag archive pages.
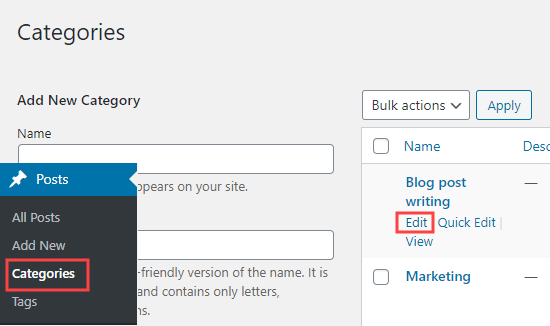
First, you need to visit the Posts » Categories page. Take your mouse over to the category you want to edit and then click on the ‘Edit’ link.
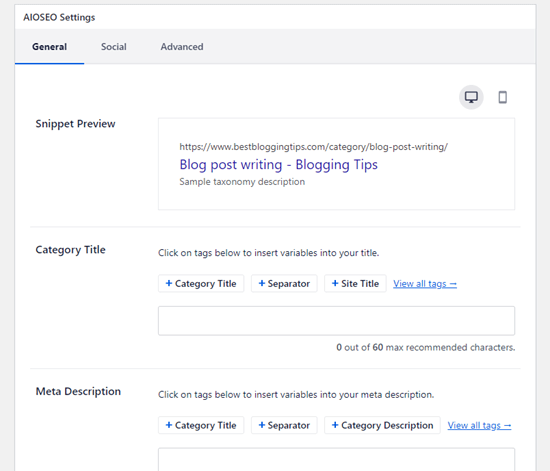
Scroll down on the category’s page to the AIOSEO Settings box. Here, you just need to enter a meta description for your category. Again, you can use All in One SEO’s tags within this if you want to.
To add keywords, simply click on the Advanced tab like you would for any post or page.
Make sure you save the changes to your category before moving on.
Your meta description and keywords will now be used for the category page, which is the archive of posts in that category.
You can repeat the process to add meta keywords and descriptions to your blog’s tags and other custom taxonomy archive pages.
All in One SEO integrates seamlessly with other popular WordPress plugins. This allows you to add keywords and meta description for your WooCommerce product pages, SeedProd landing pages, MemberPress course pages, and more.
We hope this article helped you learn how to easily add keywords and meta description to your WordPress posts and pages. You may also want to see our step by step guide on how to create an email newsletter to grow your website traffic, and our comparison of the best WordPress contact form plugins.


